 May 29, 2015
The book my husband created this character for has finally been published. Check it out here!
Since MagKnits has gone offline, I have decided to reprint my Pentapus pattern here. Enjoy!
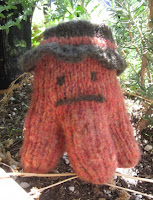
My husband created Pentapus for a children’s comic he has been working on. I thought this cute little guy would make a great toy, so I challenged myself to find a way to knit him even though I was still fairly new to knitting.
Each leg of the toy is knit from the bottom up. The stockiness of the legs, combined with the way they are joined together, enables the toy to stand on its own. The recommended yarn results in a super soft toy whose stitches are evident, but I have also used “furry” yarns to create cuddly Pentapi whose stitches are not apparent.
The toy is worked in the round to minimize finishing. Instead of being knitted as a separate, detachable “accessory,” the hat is attached directly to the body and is used to close off the toy. These features make this adorable, cuddly critter a quick knit that can be whipped up in a single afternoon. The minimal yarn requirements also mean this endearing fellow is a great stash reducer.
Materials neededCrystal Palace Merino Frappe [80% Merino Wool, 20%Polyamide; 140yd/128m per 50g skein]
[MC] #065 Cinnamon Toast; 1 skein[CC] # 020B New Sage; 1 skein
Note: Each skein of Crystal Palace Merino Frappe will make either 3 Pentapus bodies and 2 hats OR 2 Pentapus bodies and 3 hats, so 2 skeins will make 5 complete Pentapi.
2 set(s) US #7/4.5 mm double-point needles
Tapestry needle
5 Stitch holders or safety pins
Polyester fiberfill for stuffing
Yarn substitutes
GGH Bel Air [90% Merino Wool, 10%Polyamide; 142yd/80m per 50g skein]
GGH Esprit [100%Polyamide; 87yd/80m per 50g skein]
SizesOne size fits children of all ages. : )
Gauge
20 sts/24 rows = 10cm (4 inches) in stockinette stitch
Special Stitch Instructions: Duplicate Stitch Embroidery
Thread a tapestry needle with desired embroidery thread. Bring the tip of the needle from the WS of work to the RS at the base of the first stitch to be worked. “Trace” this stitch by bringing the needle through both loops of the stitch above it and reinserting it at the base of the stitch being traced.
Legs – Make 5
Using MC, cast 6 sts onto a DPN using long tail cast on. Distribute over 3 needles so that once you are working in the round, you have 2 sts on each needle. Join to work in the round, being careful not to twist.
Round 1: Knit, knitting in tail from cast on.
Round 2: Kfb every stitch. You will now have a total of 12 sts, 4 on each needle.
Cont in St st until work measures 2.75 inches. This will create a tube about the length of your index finger and it should fit your finger like the finger of a glove.
Place the next 8 sts on a safety pin or stitch holder. Leave the last 4 sts on the DPN. This DPN will become a holder for all subsequent legs. Break yarn, leaving a 3 inch tail.
As you finish each subsequent leg, transfer the next 8 sts to a safety pin or stitch holder. Place the last 4 sts on the same DPN that is holding the last 4 sts of each previous leg. Break yarn, leaving a 3 inch tail. Be sure that the open tops of each leg are all on the same side of the DPN.
Joining Inner Portion of Legs
Take the DPN that holds all 5 legs in your left hand. The open tops of the legs should face away from you. Using MC, attach the legs to each other as follows: k3tog, k3tog, k3tog, k2tog, k3tog, k3tog, k3tog. 7 sts rem.
Distribute these 7 sts over 3 DPNs Join to work in the round being careful not to twist. Work as follows: k2tog, k2tog, k3tog. 3 sts rem.
Place the 3 rem sts on a single DPN. K3tog. Break yarn. Pass end of yarn through remaining stitch and pull loop closed.
Joining Outer Portion of Legs and Forming the Body
Distribute the 40 sts that have been on stitch holders or safety pins over 3 DPNs.
Round 1: Using MC, knit each stitch, except where one leg ends and another begins. In these 5 places, k2tog with one stitch coming from each leg. 35 sts rem. Legs are now joined for working in the round to form the body.
Cont in St st until work measures 2 .25 inches from where legs were joined together. Break yarn, leaving a 4 inch tail. When attaching the hat to the body, knit this tail in. These few sts of MC will serve as a guide for embroidering the band of the hat. 
With work still on the needles, flip work over so the bottom is facing up. Using the tails left from making each individual leg and a tapestry needle, stitch closed the gaps that resulted when legs were joined. When each gap has been closed, draw the end of the yarn inside the toy and knot off. There is no need to weave in ends as toy will be stuffed and ends hidden inside.
With CC, embroider the face as desired. The top of the eyes should be at least 4 stitches from the needle so they will not be covered by the brim of the hat.
Making and Attaching the Hat
Using CC, cast on 68 sts onto second set of DPNs. Join to begin working in the round, being careful not to twist.
Round 1: K, p entire round.
Round 2: [k, p, k2tog, p, k, p2tog] to last 4 sts. K, p, k2tog. 51 sts rem.
Round 3: [k, p2tog] to last 3 sts. K, p, k. 35 sts rem.
Place the DPNs holding the brim of the hat on top of the DPNs holding the body of the Pentapus, as if putting a hat on the toy’s head. Align the DPNs so that the next stitch to be worked on the body is next to the next stitch to be worked on the hat. Insert a DPN through next stitch to be worked on the body and next stitch to be worked on the hat. Knit these 2 stitches together using CC and the tail of MC attached to the body. Continue in this manner until hat has been joined to the body.
With CC, work in St st until hat measures 1 .25 inches from the point it was joined to the body.
Insert a DPN through the next stitch on the needle and through the purl of the stitch that is 2 sts below this stitch. Knit together the stitch on the needle and the purl of the stitch 2 sts. (You may need to use the tip of a tapestry needle to lift the purl over the working yarn when knitting it together with the stitch on the needle.) Continue in this manner for one full row. This creates a ridge at the top of the hat and changes the direction of the work so that the top of the hat lies flat.
Leave work on the needles – you will continue knitting to close the hat once you have embroidered the band onto the hat and stuffed the toy.
Use duplicate stitch embroidery to make the band of the hat. Knitting in the tail of the body when joining the hat to the body results in a good road map for embroidering the first few sts of the band.
Thread a tapestry needle with a double length of MC. Bring the tip of the needle from inside the toy to outside the toy, at the base of the first stitch joining the hat to the body. “Trace” this stitch by bringing the needle through both loops of the stitch above it and reinserting it at the base of the stitch being traced. Repeat on the adjacent stitch in the row, continuing until you have made a band that fully encircles the hat. Knot off ends.
Stuff toy with fiber fill. Be sure to stuff legs firmly so toy will stand on its own.
Closing the Hat
Round 1: Knit
Round 2: [K, k2tog] to last 2 sts. K, k. 24 sts rem.
Round 3: Knit
Round 4: K2tog entire round. 12 sts rem.
Round 5: Knit
Round 6: K3tog entire round. 4 sts rem.
Transfer all 4 sts to a single DPN. K4tog.
Break yarn and thread tail through loop of single remaining stitch. Pull tight. Thread a tapestry needle with tail and weave through a few stitches in top of the hat. Push needle through center of hat, down into body and out the bottom of toy. Knot off. Trim excess yarn.


